/* eslint-disable  @typescript-eslint/no-explicit-any */

'use client'
import {useState,useEffect} from 'react'
import { useContext } from 'react';
import { Toaster, toaster } from "@/components/ui/toaster"
import { buildTransactionUrl, shortenAddress, sortedQuaiShardNames } from '@/components/utils';
import { quais } from 'quais';
import TestNFT from '../../artifacts/contracts/ERC721.sol/TestERC721.json';
import { StateContext } from '@/app/store';
import ConnectButton from './connectButton';
import { useGetAccounts } from '@/components/wallet';

export default function Mint() {
  useGetAccounts();
  const [nftName, setNFTName] = useState('NFT Name');
  const [symbol, setSymbol] = useState('NFT Symbol');
  const [isOwner, setIsOwner] = useState(false);
  const [tokenId, setTokenId] = useState(null);
  const [newSupply, setNewSupply] = useState(0);
  const [newPrice, setNewPrice] = useState(0);
  const [nftBalance, setNFTBalance] = useState(0);
  const [mintPrice, setMintPrice] = useState(BigInt(0));
  const [tokenSupply, setTokenSupply] = useState(null);
  const [remainingSupply, setRemainingSupply] = useState(0);
  const [contractBalance, setContractBalance] = useState(0);
  const { web3Provider, account } = useContext(StateContext);
  const contractAddress = process.env.NEXT_PUBLIC_DEPLOYED_CONTRACT as string; // Change this to your contract address
  const tokenuri = "https://example.com";

  const getContractBalance = async () => {
	const resp = await fetch('https://orchard.quaiscan.io/api/v2/addresses/'+contractAddress);
	const ret = await resp.json();
	if(ret.coin_balance){
  	setContractBalance(Number(ret.coin_balance)/Number(1000000000000000000));
  	console.log("Contract Balance: "+contractBalance);
	}
  }

  const callContract = async (type: string) => {
	if(type == 'balanceOf') {
  	const ERC721contract = new quais.Contract(contractAddress, TestNFT.abi, await web3Provider.getSigner());
  	const balance = await ERC721contract.balanceOf(account?.addr);
  	if(balance){
    	console.log("Balance: "+balance);
    	setNFTBalance(balance);
  	}
  	return balance;
	}
	else if(type == 'symbol'){
  	const ERC721contract = new quais.Contract(contractAddress, TestNFT.abi, await web3Provider.getSigner());
  	const contractSymbol = await ERC721contract.symbol();
  	if(contractSymbol){
    	setSymbol(contractSymbol);
  	}
  	return contractSymbol;
	}
	else if(type == 'name'){
  	const ERC721contract = new quais.Contract(contractAddress, TestNFT.abi, await web3Provider.getSigner());
  	const contractName = await ERC721contract.name();
  	if(contractName){
    	setNFTName(contractName);
  	}
  	return contractName;
	}
	else if(type == 'owner'){
  	const ERC721contract = new quais.Contract(contractAddress, TestNFT.abi, await web3Provider.getSigner());
  	const contractOwner = await ERC721contract.owner();
  	if(account?.addr == contractOwner){
    	setIsOwner(true);
  	}
  	return contractOwner;
	}
	else if(type == 'mintPrice'){
  	const ERC721contract = new quais.Contract(contractAddress, TestNFT.abi, await web3Provider.getSigner());
  	const price = await ERC721contract.mintPrice();
  	if(price){
    	console.log('mintPrice: '+(price/BigInt(1000000000000000000)));
    	setMintPrice(price/BigInt(1000000000000000000));
  	}
  	return price;
	}
	else if(type == 'tokenid'){
  	const ERC721contract = new quais.Contract(contractAddress, TestNFT.abi, await web3Provider.getSigner());
  	const tokenid = await ERC721contract.tokenIds();
  	if(tokenid >= 0){
    	console.log("tokenid: "+tokenid);
    	setTokenId(tokenid);
  	}
	}
	else if(type == 'supply'){
  	const ERC721contract = new quais.Contract(contractAddress, TestNFT.abi, await web3Provider.getSigner());
  	const supply = await ERC721contract.supply();
  	if(supply){
    	console.log("supply: "+supply);
    	setTokenSupply(supply);
  	}
  	return supply;
	}
	else if(type == 'mint'){
  	try {
    	const ERC721contract = new quais.Contract(contractAddress, TestNFT.abi, await web3Provider.getSigner());
    	const price = await ERC721contract.mintPrice();
    	const contractTransaction = await ERC721contract.mint(account?.addr,tokenuri,{value: price});
    	const txReceipt = await contractTransaction.wait();
    	return Promise.resolve({ result: txReceipt, method: "Mint" });
  	} catch (err) {
    	return Promise.reject(err);
  	}
	}
	else if(type == 'withdraw'){
  	try {
    	const ERC721contract = new quais.Contract(contractAddress, TestNFT.abi, await web3Provider.getSigner());
    	const contractTransaction = await ERC721contract.withdraw();
    	const txReceipt = await contractTransaction.wait();
    	console.log(txReceipt);
    	return Promise.resolve({ result: txReceipt, method: "Withdraw" });
  	} catch (err) {
    	return Promise.reject(err);
  	}
	}
	else if(type=='updateSupply'){
  	try {
    	const ERC721contract = new quais.Contract(contractAddress, TestNFT.abi, await web3Provider.getSigner());
    	if(newSupply > 0){
      	console.log("New Supply Value: "+newSupply);
      	const contractTransaction = await ERC721contract.updateSupply(newSupply);
      	const txReceipt = await contractTransaction.wait();
      	console.log(txReceipt);
      	return Promise.resolve({ result: txReceipt, method: "updateSupply" });
    	}
  	} catch (err) {
    	return Promise.reject(err);
  	}
	}
	else if(type=='updatePrice'){
  	try {
    	const ERC721contract = new quais.Contract(contractAddress, TestNFT.abi, await web3Provider.getSigner());
    	if(newPrice > 0){
      	const priceQuai = quais.parseQuai(String(newPrice));
      	console.log("New Price Value: "+priceQuai);
      	const contractTransaction = await ERC721contract.updateMintPrice(priceQuai);
      	const txReceipt = await contractTransaction.wait();
      	console.log(txReceipt);
      	return Promise.resolve({ result: txReceipt, method: "updateMintPrice" });
    	}
  	} catch (err) {
    	return Promise.reject(err);
  	}
	}
  };

  // HANDLE UPDATE PRICE
  const handleUpdatePrice = async () =>{
	toaster.promise(
  	callContract('updatePrice'),
  	{
    	loading: {
      	title: 'Broadcasting Transaction',
      	description: '',
    	},
    	success: ({result, method}) =>(
      	{
      	title: 'Transaction Successful',
      	description: (
        	<>
          	{result.hash ? (
            	<a
              	className="underline"
              	href={buildTransactionUrl(result.hash)}
              	target="_blank"
            	>
              	View In Explorer
            	</a>
          	) : (
            	<p>
              	{method} : {result}
            	</p>
          	)}
        	</>
      	),
      	duration: 10000,
    	}),
    	error: (error: any) => ({
      	title: 'Error',
      	description: error.reason || error.message || 'An unknown error occurred',
      	duration: 10000,
    	}),
  	}
	);
  }

  // HANDLE UPDATE SUPPLY
  const handleUpdateSupply = async () =>{
	toaster.promise(
  	callContract('updateSupply'),
  	{
    	loading: {
      	title: 'Broadcasting Transaction',
      	description: '',
    	},
    	success: ({result, method}) => (
      	{
      	title: 'Transaction Successful',
      	description: (
        	<>
          	{result.hash ? (
            	<a
              	className="underline"
              	href={buildTransactionUrl(result.hash)}
              	target="_blank"
            	>
              	View In Explorer
            	</a>
          	) : (
            	<p>
              	{method} : {result}
            	</p>
          	)}
        	</>
      	),
      	duration: 10000,
    	}),
    	error: (error: any) => ({
      	title: 'Error',
      	description: error.reason || error.message || 'An unknown error occurred',
      	duration: 10000,
    	}),
  	}
	);
  }

  // HANDLE WITHDRAW
  const handleWithdraw = async () =>{
	toaster.promise(
  	callContract('withdraw'),
  	{
    	loading: {
      	title: 'Broadcasting Transaction',
      	description: '',
    	},
    	success: ({result, method}) => (
      	{
      	title: 'Transaction Successful',
      	description: (
        	<>
          	{result.hash ? (
            	<a
              	className="underline"
              	href={buildTransactionUrl(result.hash)}
              	target="_blank"
            	>
              	View In Explorer
            	</a>
          	) : (
            	<p>
              	{method} : {result}
            	</p>
          	)}
        	</>
      	),
      	duration: 10000,
    	}),
    	error: (error: any) => ({
      	title: 'Error',
      	description: error.reason || error.message || 'An unknown error occurred',
      	duration: 10000,
    	}),
  	}
	);
  }

  // HANDLE MINT
  const handleMint = async () => {
	toaster.promise(
  	callContract('mint'),
  	{
    	loading: {
      	title: 'Broadcasting Transaction',
      	description: '',
    	},
    	success: ({result, method}) => (
      	{
      	title: 'Transaction Successful',
      	description: (
        	<>
          	{result.hash ? (
            	<a
              	className="underline"
              	href={buildTransactionUrl(result.hash)}
              	target="_blank"
            	>
              	View In Explorer
            	</a>
          	) : (
            	<p>
              	{method} : {result}
            	</p>
          	)}
        	</>
      	),
      	duration: 10000,
    	}),
    	error: (error: any) => ({
      	title: 'Error',
      	description: error.reason || error.message || 'An unknown error occurred',
      	duration: 10000,
    	}),
  	}
	);
  };


  useEffect(()=>{
	if(account){
  	callContract('owner');
  	callContract('tokenid');
  	callContract('supply');
  	callContract('mintPrice');
  	callContract('balanceOf');
  	callContract('symbol');
  	callContract('name');
  	getContractBalance();
	}
	if((Number(tokenId) >= 0) && (Number(tokenSupply) >= 0)){
  	if(tokenId == 0){
    	setRemainingSupply(Number(tokenSupply));
  	} else {
    	setRemainingSupply(Number(tokenSupply) - Number(tokenId));
  	}
  	console.log("Remaining Supply: "+remainingSupply);
	}
  }, [account, tokenId, tokenSupply, callContract, getContractBalance, remainingSupply]);

  return (
	<>
  	<div className="font-serif container mx-auto p-6 max-w-lg">
    	<div className="rounded-lg p-8">

      	<h1 className="text-3xl text-slate-200 font-bold text-center mb-6">QUAI NFT dApp</h1>
      	<p className="font-serif text-slate-200 mb-10">An example dApp that mints NFTs and provides additional functionality to the contract owner.</p>

      	<div className="mb-6">
        	{ (Number(tokenSupply) > 0) ?
          	<p className="text-center text-slate-200 mb-4">{Number(tokenSupply).toLocaleString()} NFTs available. </p> : <></>
        	}

        	<div className="hover:border-blue-900 shadow-lg border-2 border-stone-800 bg-gradient-to-br via-blue-900 from-slate-500 to-slate-700 font-serif p-6 rounded-lg shadow-md">
            	<h3 className="text-3xl font-semibold text-slate-300 ">{nftName ? nftName : <></>}</h3>
            	<h3 className="text-2xl font-semibold text-slate-300 underline"><a href={'https://orchard.quaiscan.io/token/'+contractAddress} target="_blank">{symbol ? symbol : <></>}</a></h3>
            	{mintPrice ?
              	<p className="text-slate-300 mt-4">Mint Price: <span className="font-bold">{mintPrice.toLocaleString()} QUAI</span></p>
              	: <></>
            	}
            	<p className="text-slate-300 mt-4">Contract Balance: <span className="font-bold">{contractBalance.toLocaleString()} QUAI</span></p>

        	</div>
      	</div>

      	<div className="mb-4">
        	{account ?
          	<label className="block text-sm font-medium text-slate-200 mb01">Connected: <span className="text-blue-400 font-bold">{sortedQuaiShardNames[account.shard].name} {shortenAddress(account.addr)}</span></label>
          	: <></>}
      	</div>

      	{((remainingSupply > 0) && account) ?
        	<p className="text-center text-slate-200 mb-4">{remainingSupply.toLocaleString()} remaining</p>
        	: account ? <><p className="text-center text-slate-200 mb-4">No More NFTs Available</p></>
        	: <></>
      	}
      	{nftBalance > 0 ?
        	<p className="text-center text-slate-200 mb-4">{nftBalance.toLocaleString()} owned</p>
        	: account ? <><p className="text-center text-slate-200 mb-4">No NFTs Owned.</p></>
        	: <></>
      	}

      	<div className="text-center">
        	{(remainingSupply > 0) && account ?
          	<button
            	className="w-full relative inline-flex items-center justify-center p-0.5 mb-2 me-2 overflow-hidden font-bold text-gray-900 rounded-lg group bg-gradient-to-br from-blue-200 via-blue-300 to-blue-700 group-hover:from-red-200 group-hover:via-red-300 group-hover:to-red-700 dark:text-white dark:hover:text-gray-900 focus:ring-4 focus:outline-none focus:ring-red-100 dark:focus:ring-red-400"
            	onClick={()=>handleMint()}>
              	<span className="w-full relative px-5 py-2.5 transition-all ease-in duration-75 bg-white dark:bg-gray-900 rounded-md group-hover:bg-opacity-0">
                	Mint
              	</span>
          	</button> : <></>
        	}
        	{!account ? <ConnectButton/> : <></>}


        	{isOwner && account ?
          	<>
          	<button
            	className="w-full relative inline-flex items-center justify-center p-0.5 mb-2 me-2 overflow-hidden font-bold text-gray-900 rounded-lg group bg-gradient-to-br from-blue-200 via-blue-300 to-blue-700 group-hover:from-red-200 group-hover:via-red-300 group-hover:to-red-700 dark:text-white dark:hover:text-gray-900 focus:ring-4 focus:outline-none focus:ring-red-100 dark:focus:ring-red-400"
            	onClick={()=>handleWithdraw()}>
              	<span className="w-full relative px-5 py-2.5 transition-all ease-in duration-75 bg-white dark:bg-gray-900 rounded-md group-hover:bg-opacity-0">
                	Withdraw
              	</span>
          	</button>
          	<div className="flex items-center space-x-2 mb-2">
            	<input onChange={e => setNewSupply(parseInt(e.target.value))} type="number" className="text-black px-4 py-2 border rounded-md focus:outline-none focus:ring-2 focus:ring-blue-400" placeholder="0"/>
            	<button className="w-full relative inline-flex items-center justify-center p-0.5 mb-2 me-2 overflow-hidden font-bold text-gray-900 rounded-lg group bg-gradient-to-br from-blue-200 via-blue-300 to-blue-700 group-hover:from-red-200 group-hover:via-red-300 group-hover:to-red-700 dark:text-white dark:hover:text-gray-900 focus:ring-4 focus:outline-none focus:ring-red-100 dark:focus:ring-red-400"
              	onClick={()=>handleUpdateSupply()}
              	>
              	Update Supply
            	</button>
          	</div>
          	<div className="flex items-center space-x-2">
            	<input onChange={e => setNewPrice(parseInt(e.target.value))} type="number" className="text-black px-4 py-2 border rounded-md focus:outline-none focus:ring-2 focus:ring-blue-400" placeholder="0"/>
            	<button className="w-full relative inline-flex items-center justify-center p-0.5 mb-2 me-2 overflow-hidden font-bold text-gray-900 rounded-lg group bg-gradient-to-br from-blue-200 via-blue-300 to-blue-700 group-hover:from-red-200 group-hover:via-red-300 group-hover:to-red-700 dark:text-white dark:hover:text-gray-900 focus:ring-4 focus:outline-none focus:ring-red-100 dark:focus:ring-red-400"
              	onClick={()=>handleUpdatePrice()}
              	>
              	Update Mint Price
            	</button>
          	</div>

          	</> : <></>
        	}

      	</div>

    	</div>
  	</div>
  	<Toaster/>

	</>
  )

}

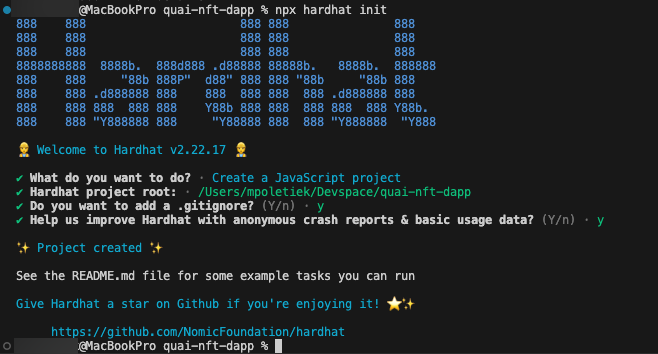 This command creates a basic folder structure for hardhat and a few examples for us.
We will need to configure hardhat to deploy our smart contract using
This command creates a basic folder structure for hardhat and a few examples for us.
We will need to configure hardhat to deploy our smart contract using  次に、コントラクトをデプロイするためのスクリプトを作成する必要があります。
 すべてが正しく設定されていれば、
 このスクリプトが最初に行うことは、Quaiネットワーク上でトランザクションをブロードキャストすることです。結果を受け取るにはトランザクションがマイニングされるまで待つ必要がありますが、orchard.quaiscan.ioでトランザクションハッシュを監視できます。
Quaiscanで表示されたハッシュを検索してください。成功すると、スクリプトはコントラクトアドレスを返します。
このスクリプトが最初に行うことは、Quaiネットワーク上でトランザクションをブロードキャストすることです。結果を受け取るにはトランザクションがマイニングされるまで待つ必要がありますが、orchard.quaiscan.ioでトランザクションハッシュを監視できます。
Quaiscanで表示されたハッシュを検索してください。成功すると、スクリプトはコントラクトアドレスを返します。
 このコントラクトアドレスをメモしてください。後でアプリを構築して対話するために必要になります。
 orchard.quaiscan.ioでアドレスを検索することで、このコントラクトの詳細を確認することもできます。
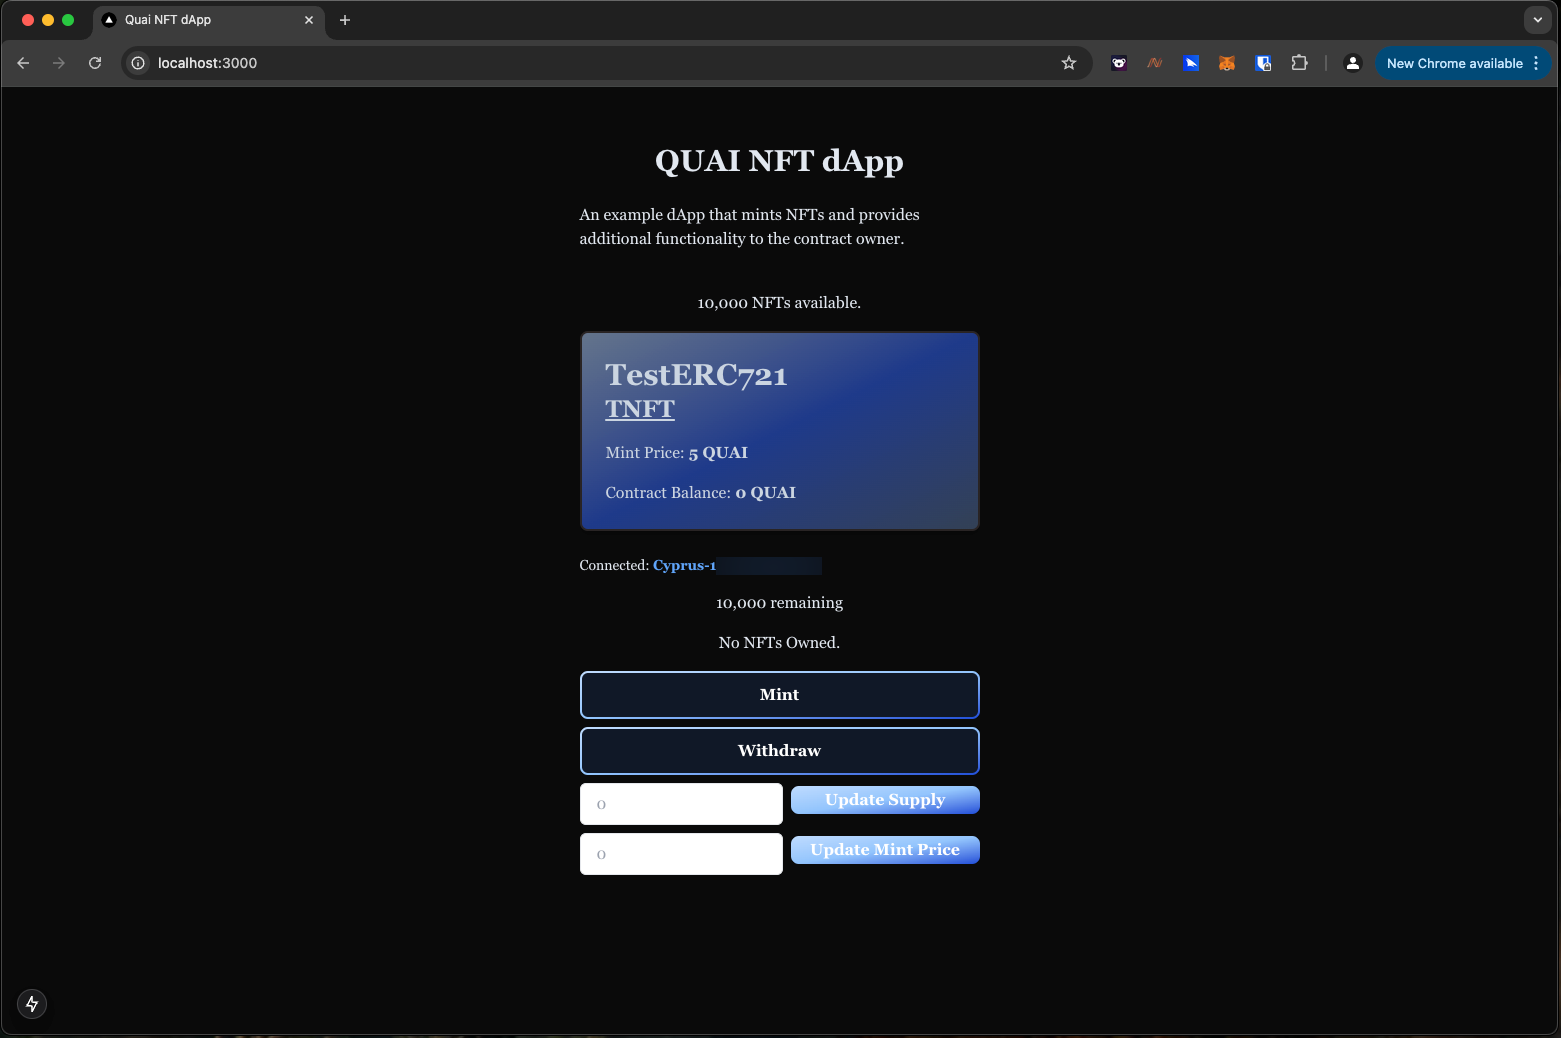 アプリをデプロイしたウォレットで接続すると、資金の引き出し、供給量またはミント価格の更新オプションが表示されます。他のすべてのウォレットはNFTのミントのみ許可されます。アプリは他のウォレットにはこの追加機能を表示せず、スマートコントラクトは所有者のみがこれらの機能を実行できるように記述されています。