> ## Documentation Index
> Fetch the complete documentation index at: https://docs.qu.ai/llms.txt
> Use this file to discover all available pages before exploring further.
# NFT dApp 구축하기
> Quai Network에서 NFT dApp을 구축하는 가이드
## 소개
이 문서는 Quai Network의 Orchard 테스트넷에서 완전히 작동하는 NFT dApp을 구축하고 배포하는 방법을 보여줍니다.
## 필수 조건
계약을 배포하고 웹앱 프론트엔드를 구축하려면 몇 가지 도구와 종속성이 필요합니다. 사용할 주요 종속성에 대한 개요는 다음과 같습니다.
| | |
| --------------------------------------------------------------------------------------------- | --------------------------------------------------- |
| [**NodeJS**](https://nodejs.org/en/download/) | Javascript 런타임 환경. LTS 버전을 사용하세요. |
| [**hardhat-example**](https://github.com/dominant-strategies/hardhat-example) | Quai Network용 샘플 계약 및 배포 스크립트가 포함된 Hardhat 프로젝트입니다. |
| [**hardhat-deploy-metadata**](https://github.com/dominant-strategies/hardhat-deploy-metadata) | 계약 메타데이터를 IPFS에 업로드하는 Hardhat 플러그인 |
| [**Quais.js**](https://www.npmjs.com/package/quais) | Quai Network와 상호 작용하기 위한 JavaScript 라이브러리입니다. |
| [**OpenZeppelin**](https://www.openzeppelin.com/) | Solidity에서 스마트 계약을 구축하기 위한 도구입니다. |
| [**NextJS**](https://nextjs.org/) | React 앱에 서버 사이드 렌더링을 제공하는 Javascript 프레임워크입니다. |
| [**Chakra UI**](https://www.chakra-ui.com/) | React 앱용 UI 스타일링 프레임워크입니다. |
## 실습
오늘은 QUAI에서 NFT dApp을 구축하고 웹 인터페이스를 통해 상호 작용하며 민트 가격과 총 공급량과 같은 일부 속성을 관리할 것입니다.
이 가이드를 따를 때 최상의 경험을 위해 MacOS 또는 Linux에서 Chrome 브라우저를 사용하는 것을 권장합니다. 또한 터미널에서 작업하고 코드를 직접 편집하여 이 앱을 구축할 것이므로 아직 없다면 VSCode를 다운로드하고 설치하세요. 마지막으로 Node.js를 사용하여 웹앱을 구축할 것이므로 미리 설치하고 설정하는 것이 중요합니다.
### 자금이 있는 Quai 지갑 준비하기
이 앱을 구축하려면 자금이 있는 지갑이 필요합니다.
[pelaguswallet.io](https://pelaguswallet.io)에서 Pelagus 지갑을 받고 [faucet](https://orchard.faucet.quai.network)에서 테스트넷 Quai를 받을 수 있습니다.
### 개발 환경 설정
개발 작업을 위한 디렉토리를 만들어 보겠습니다.
```bash theme={null}
mkdir ~/Devspace && cd ~/Devspace
```
이제 새 Next.js 앱을 초기화해 보겠습니다. 몇 가지 질문을 하는 다음 명령을 실행하세요. 아래 값을 사용할 수 있습니다.
```bash theme={null}
npx create-next-app@latest
```
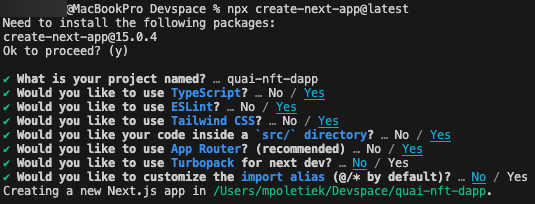
초기화가 완료되면 앱 디렉토리로 이동하여 Quais.js와 Chakra UI를 설치해 보겠습니다. 프로젝트 이름이 "my-dapp"이라고 가정하지만 다른 이름을 사용했다면 해당 이름으로 교체하세요.
```bash theme={null}
cd my-dapp && npm i --save quais @chakra-ui/react @emotion/react @emotion/styled framer-motion
```
이제 이전에 만든 개발 폴더에서 hardhat-example 저장소를 복제하고 종속성을 설치해 보겠습니다.
```bash theme={null}
cd ~/Devspace && git clone https://github.com/dominant-strategies/hardhat-example.git && cd hardhat-example/Solidity && npm i
```
### NFT 계약 편집
Solidity 디렉토리의 계약 폴더에서 기본 제공되는 두 개의 샘플 계약(ERC20 및 ERC721)을 볼 수 있습니다. 이 예제에서는 dApp에서 사용하기 쉽도록 적응된 ERC721을 사용할 것입니다.
VSCode 터미널 창에서 다음 명령을 실행하여 계약 이름을 변경하고 VSCode에서 엽니다.
```bash theme={null}
cd ~/Devspace/hardhat-example/Solidity && mv contracts/ERC721.sol contracts/MyNFT.sol && code contracts/MyNFT.sol
```
엔터티 이름과 생성자를 업데이트해 보겠습니다. 먼저 이름을 `TestERC721`에서 `MyNFT`로 업데이트합니다.
다음으로 생성자 이름을 동일하게 업데이트합니다.
이제 계약이 dApp에 더 유용하도록 몇 가지 사용자 정의 기능을 추가해 보겠습니다. 엔터티 선언 후에 몇 개의 변수를 추가합니다.
```solidity theme={null}
uint256 public mintPrice;
uint256 public maxSupply;
uint256 public totalSupply;
address public owner;
```
이 코드는 MyNFT.sol 파일의 **10번째 줄** 다음에 배치되어야 합니다.
다음으로 변수를 설정하기 위해 생성자를 업데이트해 보겠습니다. 생성자에서 다음 줄을 추가합니다.
```solidity theme={null}
mintPrice = 1000000000000000000;
maxSupply = 100;
owner = msg.sender;
```
이제 민트 함수를 추가합니다. 계약의 끝에, 마지막 닫는 중괄호 바로 앞에 민트 함수를 추가합니다.
```solidity theme={null}
function mint() public payable {
require(msg.value >= mintPrice, "Insufficient funds sent");
require(totalSupply < maxSupply, "Max supply reached");
uint256 tokenId = totalSupply;
totalSupply += 1;
_safeMint(msg.sender, tokenId);
_setTokenURI(tokenId, tokenURI(tokenId));
}
```
이렇게 하면 계약은 다음과 같이 보일 것입니다.
좋습니다! 마지막 단계는 민트 가격과 최대 공급량을 업데이트하는 함수를 추가하는 것입니다. 그런 다음 출금 함수도 추가하여 NFT 판매에서 자금을 출금할 수 있게 할 것입니다. 다음 함수를 민트 함수 뒤에 추가합니다.
```solidity theme={null}
function updateMintPrice(uint256 _mintPrice) external {
require(msg.sender == owner, "Only the owner can update mint price");
mintPrice = _mintPrice;
}
function updateMaxSupply(uint256 _maxSupply) external {
require(msg.sender == owner, "Only the owner can update max supply");
maxSupply = _maxSupply;
}
function withdraw() external {
require(msg.sender == owner, "Only the owner can withdraw funds");
payable(owner).transfer(address(this).balance);
}
```
완료되면 이렇게 보여야 합니다.
그게 다입니다! 이제 계약을 배포할 준비가 되었습니다. Ctrl+S(또는 Mac에서는 Cmd+S)를 눌러 파일을 저장하는 것을 잊지 마세요.
자신의 이미지를 NFT에 사용하려면 IPFS에 이미지와 메타데이터를 업로드해야 합니다. [스마트 계약 확인](/ko/guides/development/verifycontract) 페이지에서 이 작업을 수행하는 방법에 대한 자세한 정보를 찾을 수 있습니다. 이 가이드의 목적상 [여기](https://ipfs.io/ipfs/QmeSjSinHpPnmXmspMjwiXyN6zS4E9zccariGR3jxcaWtq/)에서 사용할 수 있는 이미지가 있습니다.
### 계약 배포
계약을 배포하려면 Hardhat이 필요하며 배포 스크립트와 구성 파일도 필요합니다.
Hardhat 구성 파일 설정부터 시작하겠습니다. hardhat-example 저장소의 루트에는 환경 변수를 안전하게 보관하는 .env.dist 파일이 있습니다. 이것을 .env 파일로 복사해 보겠습니다.
```bash theme={null}
cd ~/Devspace/hardhat-example && cp .env.dist .env && code .env
```
이제 편집기에서 개인 키와 RPC URL을 추가할 수 있습니다.
계속하기 전에 MetaMask, Koala Wallet, Pelagus 또는 다른 Quai 지갑에서 개인 키와 주소를 복사해야 합니다. 민트 함수에 대한 수수료와 가스를 지불하는 데 사용되므로 지갑에 테스트넷 QUAI가 있는지 확인하세요.
.env 파일이 다음과 같이 보이도록 편집합니다.
```bash theme={null}
# 각 배포 주소에 대한 고유한 개인 키
CYPRUS1_PK="0x00000... 당신의 개인 키"
# 체인 ID (로컬: 1337, 테스트넷 및 개발넷: 9000, 메인넷: 9)
CHAIN_ID="9000"
# RPC 엔드포인트
RPC_URL="https://rpc.orchard.quai.network"
# 토큰 인수
ERC20_NAME="TestERC20"
ERC20_SYMBOL="TERC20"
ERC20_INITIALSUPPLY="1000000"
# ERC721 토큰 인수
ERC721_NAME="My NFT Collection"
ERC721_SYMBOL="MYNFT"
ERC721_BASEURI="https://ipfs.io/ipfs/QmeSjSinHpPnmXmspMjwiXyN6zS4E9zccariGR3jxcaWtq/"
```
파일을 저장하고 닫습니다.
다음으로 hardhat이 올바른 계약을 가져오도록 배포 스크립트를 업데이트합니다. 파일을 열어보겠습니다.
```bash theme={null}
cd ~/Devspace/hardhat-example/Solidity && code scripts/deployERC721.js
```
6번째 줄에서 다음과 같이 변경합니다.
```javascript theme={null}
변경 전:
const ERC721Json = require("../artifacts/contracts/ERC721.sol/TestERC721.json");
변경 후:
const ERC721Json = require("../artifacts/contracts/MyNFT.sol/MyNFT.json");
```
Hardhat에게 계약을 컴파일하도록 지시해 보겠습니다.
```bash theme={null}
cd ~/Devspace/hardhat-example/Solidity && npx hardhat compile
```
이제 배포할 준비가 되었습니다!
```bash theme={null}
npx hardhat run scripts/deployERC721.js --network cyprus1
```
배포 스크립트가 문제를 일으킨다면 환경 변수가 올바르게 설정되었는지, 종속성이 설치되었는지 확인하세요.
축하합니다! 당신은 방금 Quai 테스트넷에 NFT 계약을 배포했습니다! 계약 주소를 복사하여 안전한 곳에 보관하세요. 나중에 필요할 것입니다.
### 계약 확인
이제 계약을 Quaiscan 블록 탐색기에서 확인해 보겠습니다. 먼저 계약 ABI를 IPFS에 업로드하고 Quaiscan의 확인 페이지로 이동하여 계약을 확인해야 합니다.
스마트 계약 확인에 대한 자세한 내용은 [이 가이드](/ko/guides/development/verifycontract)를 참조하세요.
### 프론트엔드 구축
이제 프론트엔드를 구축할 차례입니다!
app.js 파일을 업데이트하여 시작해 보겠습니다. 먼저 기본 내용을 제거하고 상단에 필요한 가져오기를 추가합니다.
```bash theme={null}
cd ~/Devspace/my-dapp && code app/page.js
```
파일의 모든 내용을 다음으로 바꿉니다.
```javascript theme={null}
"use client";
import React, { useState, useEffect } from "react";
import {
Box,
Button,
ChakraProvider,
Container,
Flex,
Heading,
Input,
SimpleGrid,
Stat,
StatLabel,
StatNumber,
Text,
useToast,
VStack,
} from "@chakra-ui/react";
import { quais } from "quais";
export default function Home() {
const [provider, setProvider] = useState(null);
const [signer, setSigner] = useState(null);
const [contract, setContract] = useState(null);
const [account, setAccount] = useState("");
const [mintPrice, setMintPrice] = useState("0");
const [maxSupply, setMaxSupply] = useState("0");
const [totalSupply, setTotalSupply] = useState("0");
const [newMintPrice, setNewMintPrice] = useState("");
const [newMaxSupply, setNewMaxSupply] = useState("");
const [isOwner, setIsOwner] = useState(false);
const toast = useToast();
// 계약 주소와 ABI는 하드코딩되어 있습니다
const contractAddress = "YOUR_CONTRACT_ADDRESS_HERE";
const contractABI = [
// 여기에 계약 ABI를 추가합니다
];
return (
My NFT dApp
Web3에 연결하여 NFT를 민트하세요!
);
}
```
계약 ABI를 가져와야 합니다. VSCode의 새 터미널에서 다음을 실행합니다.
```bash theme={null}
cd ~/Devspace/hardhat-example/Solidity && cat artifacts/contracts/MyNFT.sol/MyNFT.json | grep -A 1000 '"abi":'
```
출력에서 `"abi": [` 다음부터 마지막 `]`까지(포함)를 복사하여 `contractABI` 변수에 붙여넣습니다. 또한 `contractAddress` 변수를 이전에 저장한 계약 주소로 업데이트하는 것을 잊지 마세요.
이제 컴포넌트에 기능을 추가해 보겠습니다. `return` 문 바로 앞에 다음 함수를 추가합니다.
```javascript theme={null}
// 지갑 연결
const connectWallet = async () => {
if (typeof window.ethereum !== "undefined") {
try {
await window.ethereum.request({ method: "eth_requestAccounts" });
const web3Provider = new quais.BrowserProvider(window.ethereum);
const web3Signer = await web3Provider.getSigner();
const address = await web3Signer.getAddress();
setProvider(web3Provider);
setSigner(web3Signer);
setAccount(address);
// 계약 초기화
const nftContract = new quais.Contract(
contractAddress,
contractABI,
web3Signer
);
setContract(nftContract);
// 계약 데이터 로드
await loadContractData(nftContract, address);
toast({
title: "지갑 연결됨",
description: `주소: ${address.slice(0, 6)}...${address.slice(-4)}`,
status: "success",
duration: 3000,
isClosable: true,
});
} catch (error) {
console.error("지갑 연결 실패:", error);
toast({
title: "연결 실패",
description: error.message,
status: "error",
duration: 3000,
isClosable: true,
});
}
} else {
toast({
title: "지갑을 찾을 수 없음",
description: "MetaMask나 다른 Web3 지갑을 설치해주세요",
status: "warning",
duration: 3000,
isClosable: true,
});
}
};
// 계약 데이터 로드
const loadContractData = async (nftContract, userAddress) => {
try {
const price = await nftContract.mintPrice();
const max = await nftContract.maxSupply();
const total = await nftContract.totalSupply();
const ownerAddress = await nftContract.owner();
setMintPrice(quais.formatEther(price));
setMaxSupply(max.toString());
setTotalSupply(total.toString());
setIsOwner(userAddress.toLowerCase() === ownerAddress.toLowerCase());
} catch (error) {
console.error("계약 데이터 로드 실패:", error);
}
};
// NFT 민트
const mintNFT = async () => {
if (!contract) return;
try {
const price = await contract.mintPrice();
const tx = await contract.mint({ value: price });
toast({
title: "민팅 중...",
description: "트랜잭션이 처리되고 있습니다",
status: "info",
duration: 5000,
isClosable: true,
});
await tx.wait();
toast({
title: "민트 성공!",
description: "NFT가 성공적으로 민트되었습니다",
status: "success",
duration: 5000,
isClosable: true,
});
// 총 공급량 업데이트
const total = await contract.totalSupply();
setTotalSupply(total.toString());
} catch (error) {
console.error("민트 실패:", error);
toast({
title: "민트 실패",
description: error.message,
status: "error",
duration: 5000,
isClosable: true,
});
}
};
// 민트 가격 업데이트
const updateMintPrice = async () => {
if (!contract || !newMintPrice) return;
try {
const priceInWei = quais.parseEther(newMintPrice);
const tx = await contract.updateMintPrice(priceInWei);
toast({
title: "업데이트 중...",
description: "트랜잭션이 처리되고 있습니다",
status: "info",
duration: 5000,
isClosable: true,
});
await tx.wait();
toast({
title: "가격 업데이트됨",
description: "민트 가격이 성공적으로 업데이트되었습니다",
status: "success",
duration: 5000,
isClosable: true,
});
setMintPrice(newMintPrice);
setNewMintPrice("");
} catch (error) {
console.error("가격 업데이트 실패:", error);
toast({
title: "업데이트 실패",
description: error.message,
status: "error",
duration: 5000,
isClosable: true,
});
}
};
// 최대 공급량 업데이트
const updateMaxSupply = async () => {
if (!contract || !newMaxSupply) return;
try {
const tx = await contract.updateMaxSupply(newMaxSupply);
toast({
title: "업데이트 중...",
description: "트랜잭션이 처리되고 있습니다",
status: "info",
duration: 5000,
isClosable: true,
});
await tx.wait();
toast({
title: "공급량 업데이트됨",
description: "최대 공급량이 성공적으로 업데이트되었습니다",
status: "success",
duration: 5000,
isClosable: true,
});
setMaxSupply(newMaxSupply);
setNewMaxSupply("");
} catch (error) {
console.error("공급량 업데이트 실패:", error);
toast({
title: "업데이트 실패",
description: error.message,
status: "error",
duration: 5000,
isClosable: true,
});
}
};
// 자금 출금
const withdrawFunds = async () => {
if (!contract) return;
try {
const tx = await contract.withdraw();
toast({
title: "출금 중...",
description: "트랜잭션이 처리되고 있습니다",
status: "info",
duration: 5000,
isClosable: true,
});
await tx.wait();
toast({
title: "출금 성공",
description: "자금이 성공적으로 출금되었습니다",
status: "success",
duration: 5000,
isClosable: true,
});
} catch (error) {
console.error("출금 실패:", error);
toast({
title: "출금 실패",
description: error.message,
status: "error",
duration: 5000,
isClosable: true,
});
}
};
```
이제 UI를 업데이트해 보겠습니다. return 문을 다음으로 교체합니다.
```javascript theme={null}
return (
My NFT dApp
{!account ? (
Web3에 연결하여 NFT를 민트하세요!
) : (
<>
연결된 주소: {account}민트 가격{mintPrice} QUAI총 공급량{totalSupply} / {maxSupply}남은 수량{maxSupply - totalSupply}
{isOwner && (
소유자 컨트롤
setNewMintPrice(e.target.value)}
type="number"
step="0.01"
/>
setNewMaxSupply(e.target.value)}
type="number"
/>
)}
)}
);
```
### 앱 실행하기
이제 앱을 실행할 준비가 되었습니다! VSCode의 터미널에서 다음을 실행합니다.
```bash theme={null}
cd ~/Devspace/my-dapp && npm run dev
```
브라우저를 열고 [http://localhost:3000으로](http://localhost:3000으로) 이동합니다. 다음과 같은 것을 볼 수 있을 것입니다.
지갑 연결 버튼을 클릭하고 지갑을 연결합니다. 연결되면 다음과 같이 보일 것입니다.
계약을 배포한 계정으로 연결했다면 소유자 컨트롤 섹션도 볼 수 있을 것입니다.
축하합니다! Quai에서 첫 번째 NFT dApp을 성공적으로 구축했습니다!
### 다음 단계
이 예제를 확장하는 몇 가지 방법은 다음과 같습니다.
1. **커스텀 아트워크 추가**: 자신만의 NFT 아트워크와 메타데이터를 IPFS에 업로드하고 계약의 baseURI를 업데이트합니다.
2. **민트된 NFT 표시**: 사용자가 민트한 NFT를 표시하는 갤러리 섹션을 추가합니다.
3. **화이트리스트 기능**: 특정 주소만 민트할 수 있는 화이트리스트 기능을 추가합니다.
4. **개선된 UI**: 애니메이션, 더 나은 스타일링, 반응형 디자인을 추가합니다.
5. **메타데이터 온체인**: 메타데이터를 온체인에 저장하여 완전히 분산화된 NFT를 만듭니다.
계속 구축하고 Quai에서 가능한 것의 한계를 탐험해보세요!
 엔터티 이름과 생성자를 업데이트해 보겠습니다. 먼저 이름을 `TestERC721`에서 `MyNFT`로 업데이트합니다.
 다음으로 생성자 이름을 동일하게 업데이트합니다.
 이제 계약이 dApp에 더 유용하도록 몇 가지 사용자 정의 기능을 추가해 보겠습니다. 엔터티 선언 후에 몇 개의 변수를 추가합니다.
```solidity theme={null}
uint256 public mintPrice;
uint256 public maxSupply;
uint256 public totalSupply;
address public owner;
```
이 코드는 MyNFT.sol 파일의 **10번째 줄** 다음에 배치되어야 합니다.
이제 계약이 dApp에 더 유용하도록 몇 가지 사용자 정의 기능을 추가해 보겠습니다. 엔터티 선언 후에 몇 개의 변수를 추가합니다.
```solidity theme={null}
uint256 public mintPrice;
uint256 public maxSupply;
uint256 public totalSupply;
address public owner;
```
이 코드는 MyNFT.sol 파일의 **10번째 줄** 다음에 배치되어야 합니다.
 다음으로 변수를 설정하기 위해 생성자를 업데이트해 보겠습니다. 생성자에서 다음 줄을 추가합니다.
```solidity theme={null}
mintPrice = 1000000000000000000;
maxSupply = 100;
owner = msg.sender;
```
다음으로 변수를 설정하기 위해 생성자를 업데이트해 보겠습니다. 생성자에서 다음 줄을 추가합니다.
```solidity theme={null}
mintPrice = 1000000000000000000;
maxSupply = 100;
owner = msg.sender;
```
 이제 민트 함수를 추가합니다. 계약의 끝에, 마지막 닫는 중괄호 바로 앞에 민트 함수를 추가합니다.
```solidity theme={null}
function mint() public payable {
require(msg.value >= mintPrice, "Insufficient funds sent");
require(totalSupply < maxSupply, "Max supply reached");
uint256 tokenId = totalSupply;
totalSupply += 1;
_safeMint(msg.sender, tokenId);
_setTokenURI(tokenId, tokenURI(tokenId));
}
```
이렇게 하면 계약은 다음과 같이 보일 것입니다.
이제 민트 함수를 추가합니다. 계약의 끝에, 마지막 닫는 중괄호 바로 앞에 민트 함수를 추가합니다.
```solidity theme={null}
function mint() public payable {
require(msg.value >= mintPrice, "Insufficient funds sent");
require(totalSupply < maxSupply, "Max supply reached");
uint256 tokenId = totalSupply;
totalSupply += 1;
_safeMint(msg.sender, tokenId);
_setTokenURI(tokenId, tokenURI(tokenId));
}
```
이렇게 하면 계약은 다음과 같이 보일 것입니다.
 좋습니다! 마지막 단계는 민트 가격과 최대 공급량을 업데이트하는 함수를 추가하는 것입니다. 그런 다음 출금 함수도 추가하여 NFT 판매에서 자금을 출금할 수 있게 할 것입니다. 다음 함수를 민트 함수 뒤에 추가합니다.
```solidity theme={null}
function updateMintPrice(uint256 _mintPrice) external {
require(msg.sender == owner, "Only the owner can update mint price");
mintPrice = _mintPrice;
}
function updateMaxSupply(uint256 _maxSupply) external {
require(msg.sender == owner, "Only the owner can update max supply");
maxSupply = _maxSupply;
}
function withdraw() external {
require(msg.sender == owner, "Only the owner can withdraw funds");
payable(owner).transfer(address(this).balance);
}
```
완료되면 이렇게 보여야 합니다.
좋습니다! 마지막 단계는 민트 가격과 최대 공급량을 업데이트하는 함수를 추가하는 것입니다. 그런 다음 출금 함수도 추가하여 NFT 판매에서 자금을 출금할 수 있게 할 것입니다. 다음 함수를 민트 함수 뒤에 추가합니다.
```solidity theme={null}
function updateMintPrice(uint256 _mintPrice) external {
require(msg.sender == owner, "Only the owner can update mint price");
mintPrice = _mintPrice;
}
function updateMaxSupply(uint256 _maxSupply) external {
require(msg.sender == owner, "Only the owner can update max supply");
maxSupply = _maxSupply;
}
function withdraw() external {
require(msg.sender == owner, "Only the owner can withdraw funds");
payable(owner).transfer(address(this).balance);
}
```
완료되면 이렇게 보여야 합니다.
 그게 다입니다! 이제 계약을 배포할 준비가 되었습니다. Ctrl+S(또는 Mac에서는 Cmd+S)를 눌러 파일을 저장하는 것을 잊지 마세요.
자신의 이미지를 NFT에 사용하려면 IPFS에 이미지와 메타데이터를 업로드해야 합니다. [스마트 계약 확인](/ko/guides/development/verifycontract) 페이지에서 이 작업을 수행하는 방법에 대한 자세한 정보를 찾을 수 있습니다. 이 가이드의 목적상 [여기](https://ipfs.io/ipfs/QmeSjSinHpPnmXmspMjwiXyN6zS4E9zccariGR3jxcaWtq/)에서 사용할 수 있는 이미지가 있습니다.
### 계약 배포
계약을 배포하려면 Hardhat이 필요하며 배포 스크립트와 구성 파일도 필요합니다.
Hardhat 구성 파일 설정부터 시작하겠습니다. hardhat-example 저장소의 루트에는 환경 변수를 안전하게 보관하는 .env.dist 파일이 있습니다. 이것을 .env 파일로 복사해 보겠습니다.
```bash theme={null}
cd ~/Devspace/hardhat-example && cp .env.dist .env && code .env
```
이제 편집기에서 개인 키와 RPC URL을 추가할 수 있습니다.
계속하기 전에 MetaMask, Koala Wallet, Pelagus 또는 다른 Quai 지갑에서 개인 키와 주소를 복사해야 합니다. 민트 함수에 대한 수수료와 가스를 지불하는 데 사용되므로 지갑에 테스트넷 QUAI가 있는지 확인하세요.
.env 파일이 다음과 같이 보이도록 편집합니다.
```bash theme={null}
# 각 배포 주소에 대한 고유한 개인 키
CYPRUS1_PK="0x00000... 당신의 개인 키"
# 체인 ID (로컬: 1337, 테스트넷 및 개발넷: 9000, 메인넷: 9)
CHAIN_ID="9000"
# RPC 엔드포인트
RPC_URL="https://rpc.orchard.quai.network"
# 토큰 인수
ERC20_NAME="TestERC20"
ERC20_SYMBOL="TERC20"
ERC20_INITIALSUPPLY="1000000"
# ERC721 토큰 인수
ERC721_NAME="My NFT Collection"
ERC721_SYMBOL="MYNFT"
ERC721_BASEURI="https://ipfs.io/ipfs/QmeSjSinHpPnmXmspMjwiXyN6zS4E9zccariGR3jxcaWtq/"
```
파일을 저장하고 닫습니다.
다음으로 hardhat이 올바른 계약을 가져오도록 배포 스크립트를 업데이트합니다. 파일을 열어보겠습니다.
```bash theme={null}
cd ~/Devspace/hardhat-example/Solidity && code scripts/deployERC721.js
```
6번째 줄에서 다음과 같이 변경합니다.
```javascript theme={null}
변경 전:
const ERC721Json = require("../artifacts/contracts/ERC721.sol/TestERC721.json");
변경 후:
const ERC721Json = require("../artifacts/contracts/MyNFT.sol/MyNFT.json");
```
Hardhat에게 계약을 컴파일하도록 지시해 보겠습니다.
```bash theme={null}
cd ~/Devspace/hardhat-example/Solidity && npx hardhat compile
```
그게 다입니다! 이제 계약을 배포할 준비가 되었습니다. Ctrl+S(또는 Mac에서는 Cmd+S)를 눌러 파일을 저장하는 것을 잊지 마세요.
자신의 이미지를 NFT에 사용하려면 IPFS에 이미지와 메타데이터를 업로드해야 합니다. [스마트 계약 확인](/ko/guides/development/verifycontract) 페이지에서 이 작업을 수행하는 방법에 대한 자세한 정보를 찾을 수 있습니다. 이 가이드의 목적상 [여기](https://ipfs.io/ipfs/QmeSjSinHpPnmXmspMjwiXyN6zS4E9zccariGR3jxcaWtq/)에서 사용할 수 있는 이미지가 있습니다.
### 계약 배포
계약을 배포하려면 Hardhat이 필요하며 배포 스크립트와 구성 파일도 필요합니다.
Hardhat 구성 파일 설정부터 시작하겠습니다. hardhat-example 저장소의 루트에는 환경 변수를 안전하게 보관하는 .env.dist 파일이 있습니다. 이것을 .env 파일로 복사해 보겠습니다.
```bash theme={null}
cd ~/Devspace/hardhat-example && cp .env.dist .env && code .env
```
이제 편집기에서 개인 키와 RPC URL을 추가할 수 있습니다.
계속하기 전에 MetaMask, Koala Wallet, Pelagus 또는 다른 Quai 지갑에서 개인 키와 주소를 복사해야 합니다. 민트 함수에 대한 수수료와 가스를 지불하는 데 사용되므로 지갑에 테스트넷 QUAI가 있는지 확인하세요.
.env 파일이 다음과 같이 보이도록 편집합니다.
```bash theme={null}
# 각 배포 주소에 대한 고유한 개인 키
CYPRUS1_PK="0x00000... 당신의 개인 키"
# 체인 ID (로컬: 1337, 테스트넷 및 개발넷: 9000, 메인넷: 9)
CHAIN_ID="9000"
# RPC 엔드포인트
RPC_URL="https://rpc.orchard.quai.network"
# 토큰 인수
ERC20_NAME="TestERC20"
ERC20_SYMBOL="TERC20"
ERC20_INITIALSUPPLY="1000000"
# ERC721 토큰 인수
ERC721_NAME="My NFT Collection"
ERC721_SYMBOL="MYNFT"
ERC721_BASEURI="https://ipfs.io/ipfs/QmeSjSinHpPnmXmspMjwiXyN6zS4E9zccariGR3jxcaWtq/"
```
파일을 저장하고 닫습니다.
다음으로 hardhat이 올바른 계약을 가져오도록 배포 스크립트를 업데이트합니다. 파일을 열어보겠습니다.
```bash theme={null}
cd ~/Devspace/hardhat-example/Solidity && code scripts/deployERC721.js
```
6번째 줄에서 다음과 같이 변경합니다.
```javascript theme={null}
변경 전:
const ERC721Json = require("../artifacts/contracts/ERC721.sol/TestERC721.json");
변경 후:
const ERC721Json = require("../artifacts/contracts/MyNFT.sol/MyNFT.json");
```
Hardhat에게 계약을 컴파일하도록 지시해 보겠습니다.
```bash theme={null}
cd ~/Devspace/hardhat-example/Solidity && npx hardhat compile
```
 이제 배포할 준비가 되었습니다!
```bash theme={null}
npx hardhat run scripts/deployERC721.js --network cyprus1
```
이제 배포할 준비가 되었습니다!
```bash theme={null}
npx hardhat run scripts/deployERC721.js --network cyprus1
```
 배포 스크립트가 문제를 일으킨다면 환경 변수가 올바르게 설정되었는지, 종속성이 설치되었는지 확인하세요.
축하합니다! 당신은 방금 Quai 테스트넷에 NFT 계약을 배포했습니다! 계약 주소를 복사하여 안전한 곳에 보관하세요. 나중에 필요할 것입니다.
### 계약 확인
이제 계약을 Quaiscan 블록 탐색기에서 확인해 보겠습니다. 먼저 계약 ABI를 IPFS에 업로드하고 Quaiscan의 확인 페이지로 이동하여 계약을 확인해야 합니다.
스마트 계약 확인에 대한 자세한 내용은 [이 가이드](/ko/guides/development/verifycontract)를 참조하세요.
### 프론트엔드 구축
이제 프론트엔드를 구축할 차례입니다!
app.js 파일을 업데이트하여 시작해 보겠습니다. 먼저 기본 내용을 제거하고 상단에 필요한 가져오기를 추가합니다.
```bash theme={null}
cd ~/Devspace/my-dapp && code app/page.js
```
파일의 모든 내용을 다음으로 바꿉니다.
```javascript theme={null}
"use client";
import React, { useState, useEffect } from "react";
import {
Box,
Button,
ChakraProvider,
Container,
Flex,
Heading,
Input,
SimpleGrid,
Stat,
StatLabel,
StatNumber,
Text,
useToast,
VStack,
} from "@chakra-ui/react";
import { quais } from "quais";
export default function Home() {
const [provider, setProvider] = useState(null);
const [signer, setSigner] = useState(null);
const [contract, setContract] = useState(null);
const [account, setAccount] = useState("");
const [mintPrice, setMintPrice] = useState("0");
const [maxSupply, setMaxSupply] = useState("0");
const [totalSupply, setTotalSupply] = useState("0");
const [newMintPrice, setNewMintPrice] = useState("");
const [newMaxSupply, setNewMaxSupply] = useState("");
const [isOwner, setIsOwner] = useState(false);
const toast = useToast();
// 계약 주소와 ABI는 하드코딩되어 있습니다
const contractAddress = "YOUR_CONTRACT_ADDRESS_HERE";
const contractABI = [
// 여기에 계약 ABI를 추가합니다
];
return (
배포 스크립트가 문제를 일으킨다면 환경 변수가 올바르게 설정되었는지, 종속성이 설치되었는지 확인하세요.
축하합니다! 당신은 방금 Quai 테스트넷에 NFT 계약을 배포했습니다! 계약 주소를 복사하여 안전한 곳에 보관하세요. 나중에 필요할 것입니다.
### 계약 확인
이제 계약을 Quaiscan 블록 탐색기에서 확인해 보겠습니다. 먼저 계약 ABI를 IPFS에 업로드하고 Quaiscan의 확인 페이지로 이동하여 계약을 확인해야 합니다.
스마트 계약 확인에 대한 자세한 내용은 [이 가이드](/ko/guides/development/verifycontract)를 참조하세요.
### 프론트엔드 구축
이제 프론트엔드를 구축할 차례입니다!
app.js 파일을 업데이트하여 시작해 보겠습니다. 먼저 기본 내용을 제거하고 상단에 필요한 가져오기를 추가합니다.
```bash theme={null}
cd ~/Devspace/my-dapp && code app/page.js
```
파일의 모든 내용을 다음으로 바꿉니다.
```javascript theme={null}
"use client";
import React, { useState, useEffect } from "react";
import {
Box,
Button,
ChakraProvider,
Container,
Flex,
Heading,
Input,
SimpleGrid,
Stat,
StatLabel,
StatNumber,
Text,
useToast,
VStack,
} from "@chakra-ui/react";
import { quais } from "quais";
export default function Home() {
const [provider, setProvider] = useState(null);
const [signer, setSigner] = useState(null);
const [contract, setContract] = useState(null);
const [account, setAccount] = useState("");
const [mintPrice, setMintPrice] = useState("0");
const [maxSupply, setMaxSupply] = useState("0");
const [totalSupply, setTotalSupply] = useState("0");
const [newMintPrice, setNewMintPrice] = useState("");
const [newMaxSupply, setNewMaxSupply] = useState("");
const [isOwner, setIsOwner] = useState(false);
const toast = useToast();
// 계약 주소와 ABI는 하드코딩되어 있습니다
const contractAddress = "YOUR_CONTRACT_ADDRESS_HERE";
const contractABI = [
// 여기에 계약 ABI를 추가합니다
];
return (
 지갑 연결 버튼을 클릭하고 지갑을 연결합니다. 연결되면 다음과 같이 보일 것입니다.
 계약을 배포한 계정으로 연결했다면 소유자 컨트롤 섹션도 볼 수 있을 것입니다.
 축하합니다! Quai에서 첫 번째 NFT dApp을 성공적으로 구축했습니다!
### 다음 단계
이 예제를 확장하는 몇 가지 방법은 다음과 같습니다.
1. **커스텀 아트워크 추가**: 자신만의 NFT 아트워크와 메타데이터를 IPFS에 업로드하고 계약의 baseURI를 업데이트합니다.
2. **민트된 NFT 표시**: 사용자가 민트한 NFT를 표시하는 갤러리 섹션을 추가합니다.
3. **화이트리스트 기능**: 특정 주소만 민트할 수 있는 화이트리스트 기능을 추가합니다.
4. **개선된 UI**: 애니메이션, 더 나은 스타일링, 반응형 디자인을 추가합니다.
5. **메타데이터 온체인**: 메타데이터를 온체인에 저장하여 완전히 분산화된 NFT를 만듭니다.
계속 구축하고 Quai에서 가능한 것의 한계를 탐험해보세요!
축하합니다! Quai에서 첫 번째 NFT dApp을 성공적으로 구축했습니다!
### 다음 단계
이 예제를 확장하는 몇 가지 방법은 다음과 같습니다.
1. **커스텀 아트워크 추가**: 자신만의 NFT 아트워크와 메타데이터를 IPFS에 업로드하고 계약의 baseURI를 업데이트합니다.
2. **민트된 NFT 표시**: 사용자가 민트한 NFT를 표시하는 갤러리 섹션을 추가합니다.
3. **화이트리스트 기능**: 특정 주소만 민트할 수 있는 화이트리스트 기능을 추가합니다.
4. **개선된 UI**: 애니메이션, 더 나은 스타일링, 반응형 디자인을 추가합니다.
5. **메타데이터 온체인**: 메타데이터를 온체인에 저장하여 완전히 분산화된 NFT를 만듭니다.
계속 구축하고 Quai에서 가능한 것의 한계를 탐험해보세요!