> ## Documentation Index
> Fetch the complete documentation index at: https://docs.qu.ai/llms.txt
> Use this file to discover all available pages before exploring further.
# 在 Quaiscan 上验证合约
> 在 Quaiscan 上验证您的智能合约的指南。
## 简介
本文展示了如何在 Quai Network 的区块浏览器 [Quaiscan](https://quaiscan.io/) 上验证智能合约。
## 前置条件
要部署合约并在 Quaiscan 上验证它们,我们需要一些依赖项。以下是我们将使用的所有主要依赖项的概述。
| | |
| --------------------------------------------------------------------------------------------- | ---------------------------------------- |
| [**NodeJS**](https://nodejs.org/en/download/) | Javascript 运行时环境。使用 LTS 版本。 |
| [**hardhat-example**](https://github.com/dominant-strategies/hardhat-example) | 一个包含示例合约和 Quai Network 部署脚本的 Hardhat 项目。 |
| [**hardhat-deploy-metadata**](https://github.com/dominant-strategies/hardhat-deploy-metadata) | 一个将合约元数据上传到 IPFS 的 hardhat 插件。 |
| [**Quais.js**](https://www.npmjs.com/package/quais) | 用于与 Quai Network 交互的 JavaScript 库。 |
## 实践步骤
今天我们将在 Quaiscan(Quai Network 的区块浏览器)上验证智能合约。
本指南遵循[使用 Solidity 部署](https://docs.qu.ai/guides/development/solidity)指南,因此在开始之前,请确保您熟悉该指南和 [hardhat-example](https://github.com/dominant-strategies/hardhat-example) 仓库。
### 部署智能合约
按照[使用 Solidity 部署](https://docs.qu.ai/guides/development/solidity)指南,部署一个包含 IPFS 元数据的智能合约。
使用 [hardhat-example](https://github.com/dominant-strategies/hardhat-example) 仓库时,命令应该是 `npx hardhat run scripts/deployERC20.js`,它会产生类似以下的输出:
```
File added with CID: QmPCoBa1bCFmRoTD7GuexJqBAy7pqg8J4b8B48q5DgxUEV
Original IPFS hash found in bytecode: QmPCoBa1bCFmRoTD7GuexJqBAy7pqg8J4b8B48q5DgxUEV
Metadata JSON for ERC20 saved to /../hardhat-example/Solidity/metadata/ERC20_metadata.json
Transaction broadcasted: 0x0032004cc6a910b8733ad9502caa315beb74f3409bee2b481116bddfb9c8880d
Contract deployed to: 0x0015dFe3280783CD9b126D8E0ccc728B6490b2b2
```
在上面的输出中,您会看到合约的元数据已上传到 `ipfs.qu.ai`,哈希为:`QmPCoBa1bCFmRoTD7GuexJqBAy7pqg8J4b8B48q5DgxUEV`
您的哈希**将会不同**。请确保记录下来,因为我们在下一步中需要它。
### 下载 IPFS 元数据
使用 [hardhat-deploy-metadata](https://github.com/dominant-strategies/hardhat-deploy-metadata) 插件时,IPFS 元数据存储在项目的 `metadata` 文件夹下,但格式不适合 Quaiscan。
我们需要从 IPFS 下载正确格式的文件,以便上传到 Quaiscan 并验证我们的合约。
使用您部署合约时的**您的 IPFS 哈希**运行以下命令,下载元数据并将其保存为 `ipfsMeta.json`。
```
curl https://ipfs.qu.ai/ipfs/[YOUR IPFS METADATA HASH] > ipfsMeta.json
```
### 在 Quaiscan 上验证智能合约
现在我们有了部署的智能合约和正确 JSON 格式的 IPFS 元数据,我们可以在 Quaiscan 上验证我们的智能合约。
打开您的浏览器并访问 Quaiscan 上的[验证合约](https://quaiscan.io/contract-verification?shard=)页面。
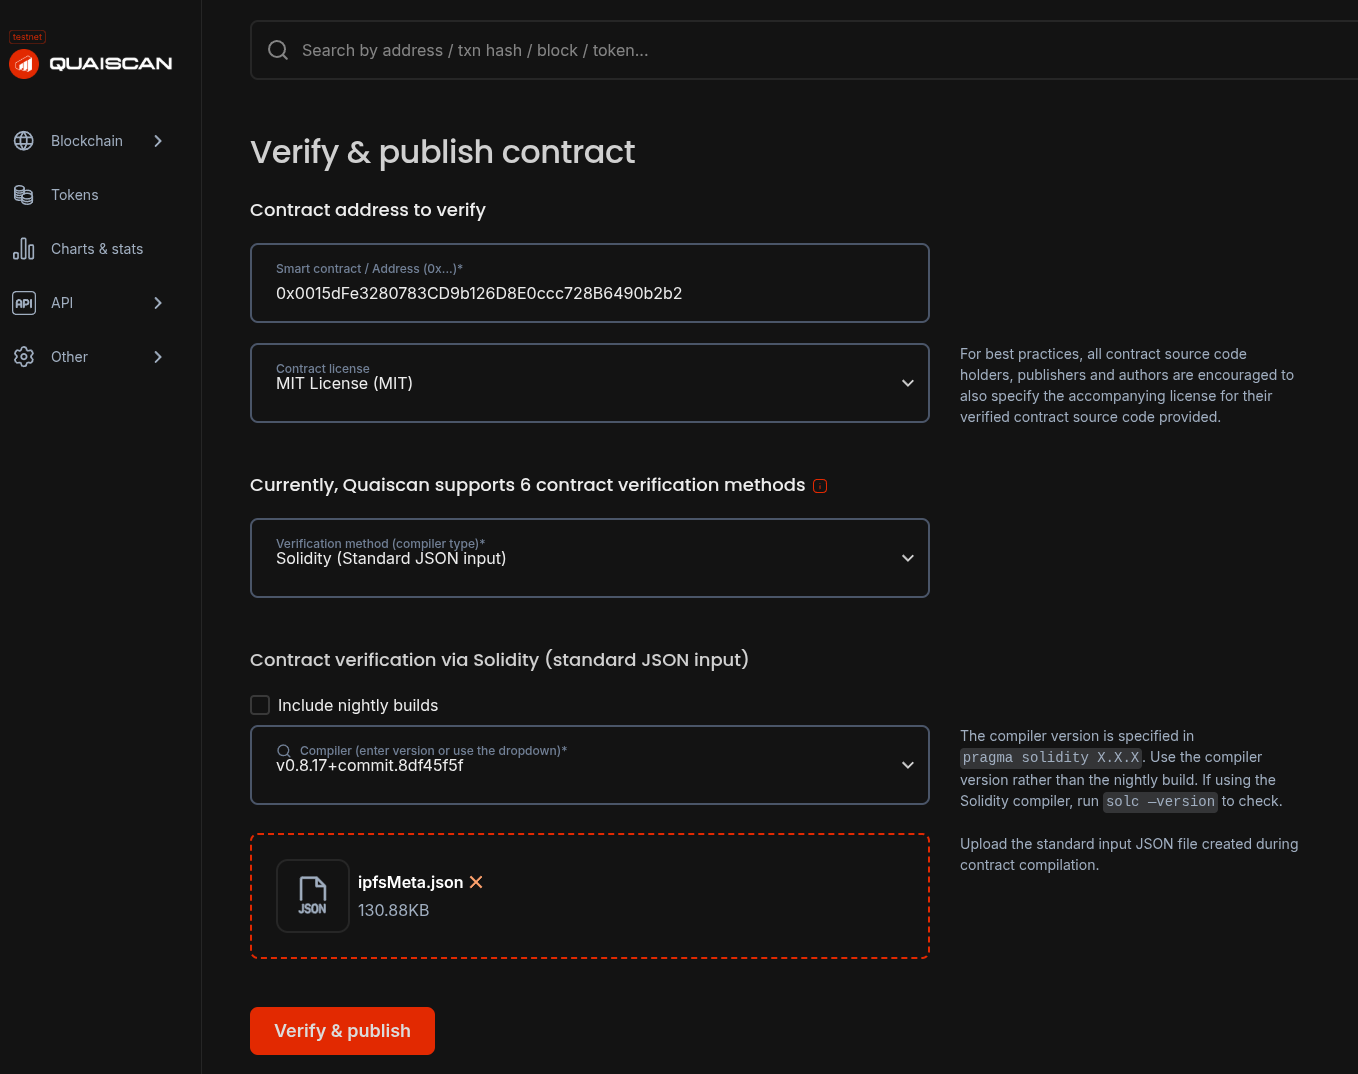
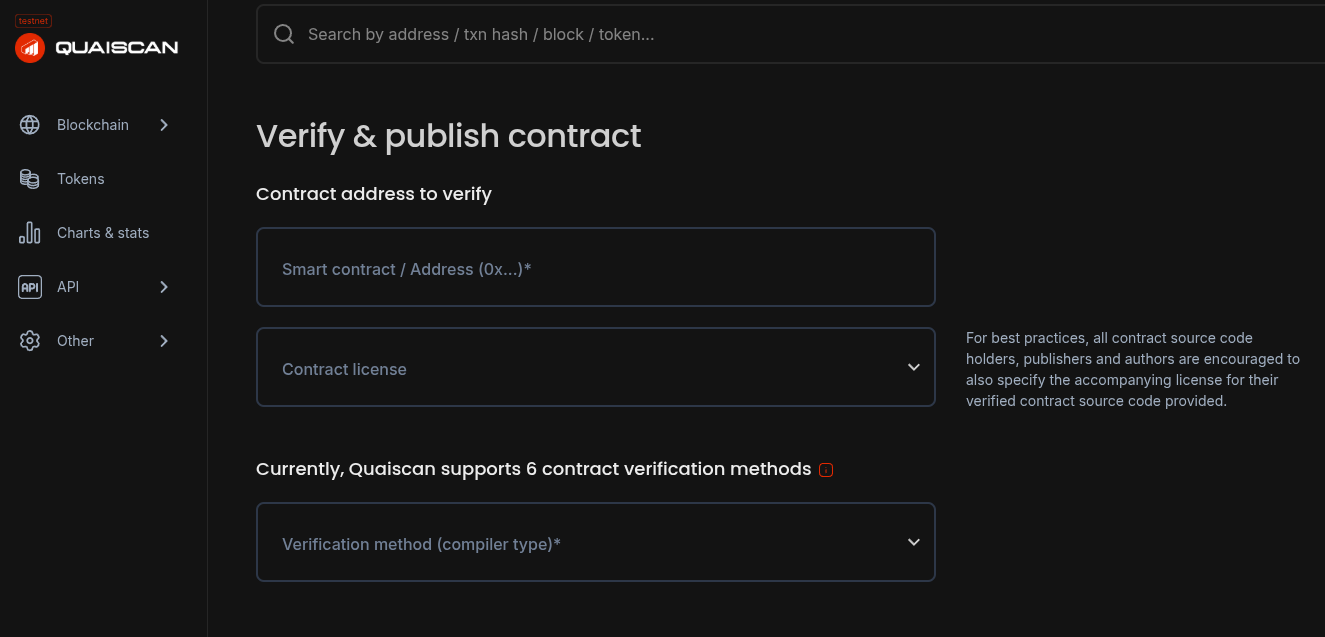 使用此页面填写您的合约的所有详细信息,确保与其编写的内容完全一致。
您需要正确的合约地址和合约代码中 `SPX-License-Identifier` 指示的许可证。
选择 **Solidity (Standard JSON input)** 作为验证方法,并选择用于编译合约的正确 Solidity 编译器版本。
最后上传 `ipfsMeta.json` 并点击 **Verify & Publish** 来验证您的智能合约。
使用此页面填写您的合约的所有详细信息,确保与其编写的内容完全一致。
您需要正确的合约地址和合约代码中 `SPX-License-Identifier` 指示的许可证。
选择 **Solidity (Standard JSON input)** 作为验证方法,并选择用于编译合约的正确 Solidity 编译器版本。
最后上传 `ipfsMeta.json` 并点击 **Verify & Publish** 来验证您的智能合约。
 成功后,您可以访问 Quaiscan 上您的合约页面,直接与其交互并查看其验证状态。
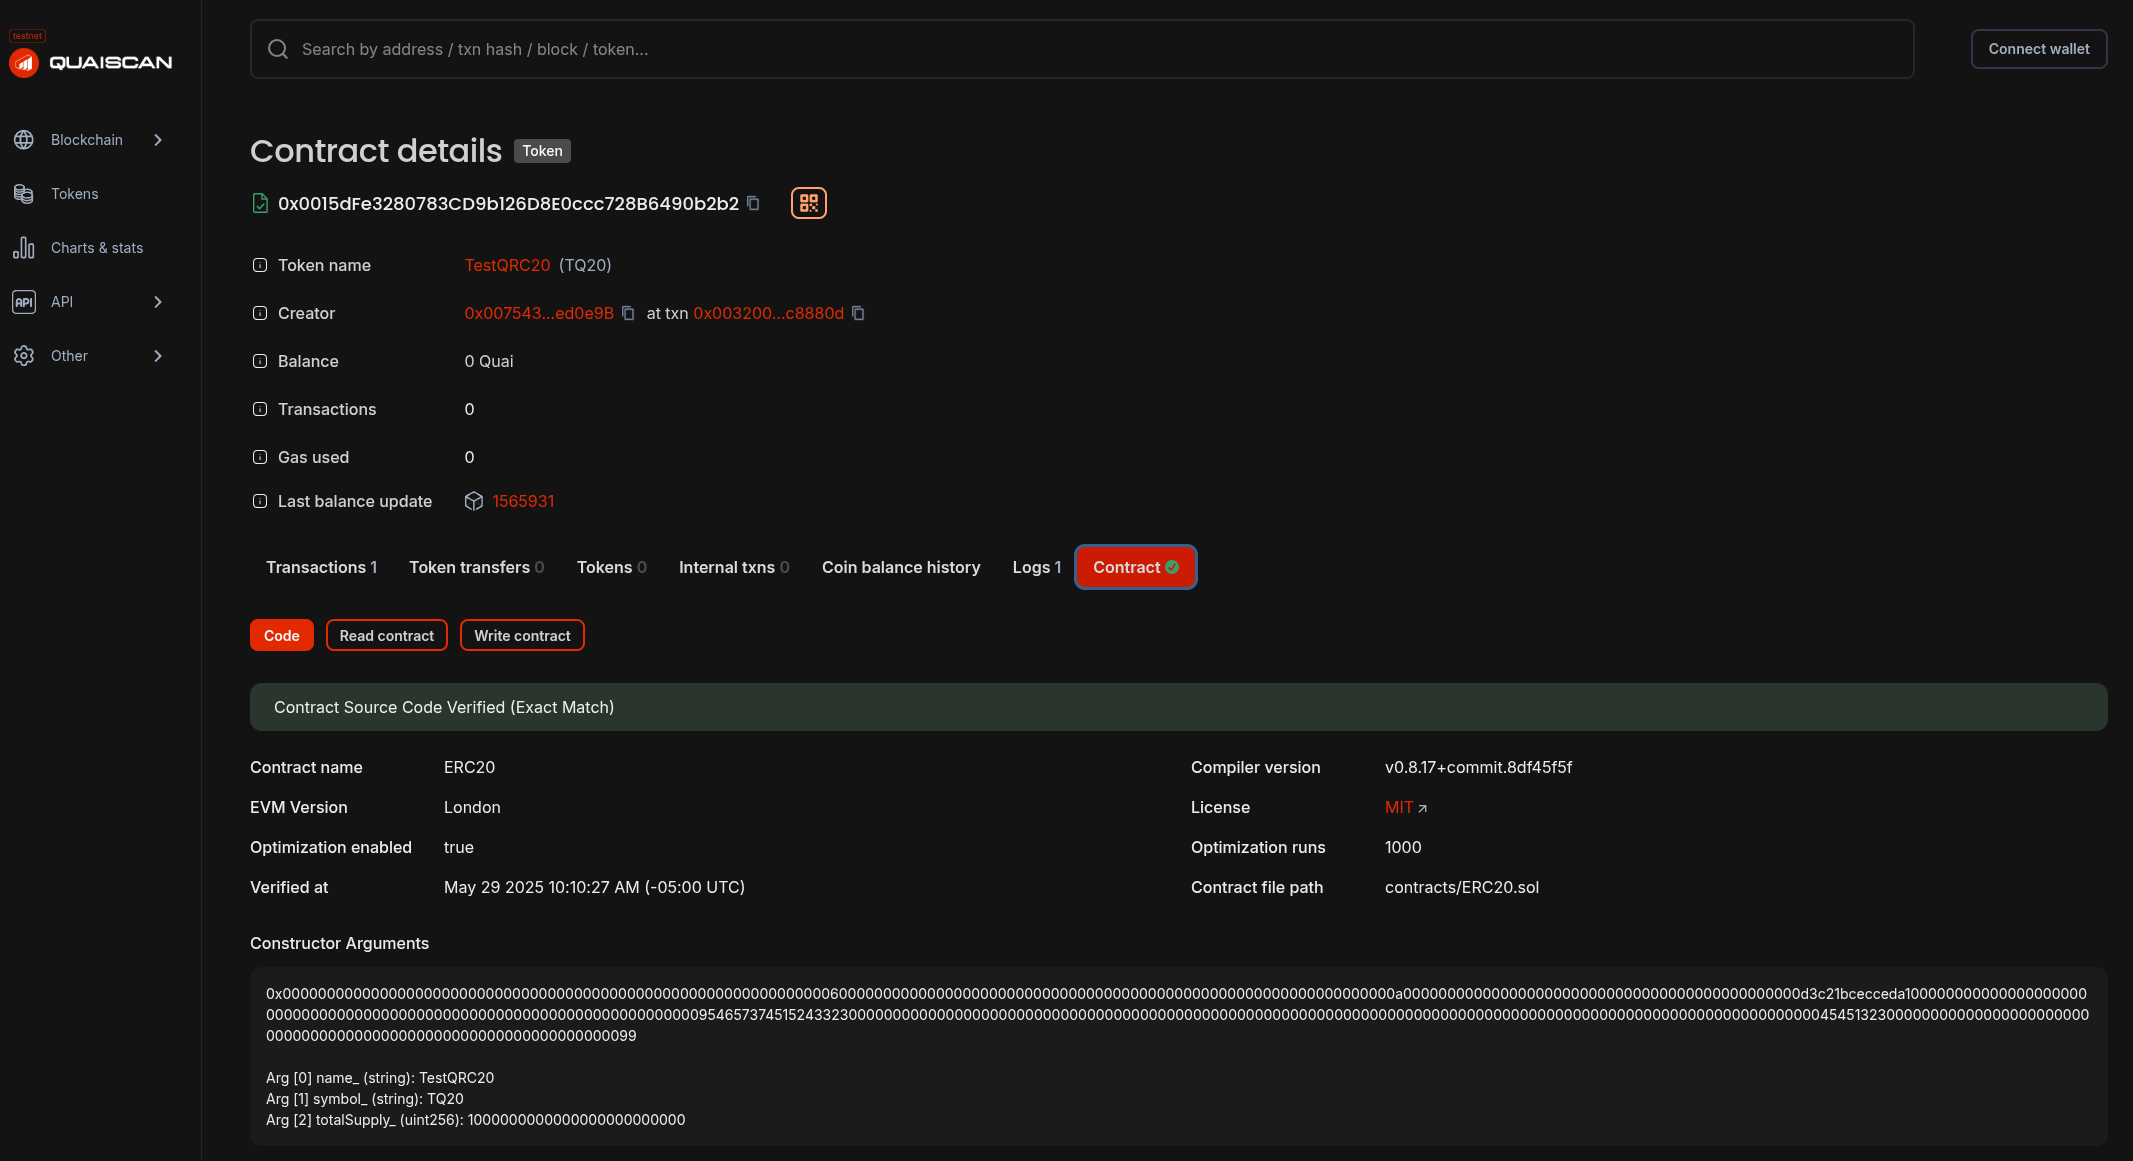 恭喜!您刚刚在 Quaiscan 上验证了您的智能合约!